Using E+ from the Dock (Mac)
Another handy way to use E+ is launching the scripts from the Dock. However, you need to do some preparations on your own.
I. First off, make Photoshop Elements the default application for Elements+ scripts:
- In Finder, go to "Applications > Elements+ > 2024 > Scripts", right-click on any script there, and select "Get File Info" option.
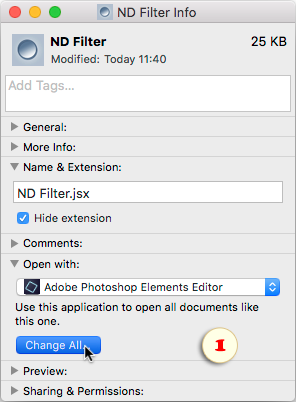
- In the "Info" box, pull "Open with" menu and choose "Other".
- In the dialog that opens, select "Enable: All Applications", navigate to "Applications > Adobe Photoshop Elements 2024 > Support Files" and select "Adobe Photoshop Elements Editor" app.
- Click "Change All", to apply your choice to all the JSX-files (fig. 1).
II. At this point, you can run any script by double-clicking it. However, doing it from the Dock will be much more convenient.
If you only plan to use the "main" scripts (as shown on fig. 2), find folder "Applications > Elements+ > 2024 > Scripts > ~" (Tilde) and drag it onto the right side of the Dock.
If you want to execute "supplementary" scripts without opening the "Scripts" dialog, put into the Dock the whole "Scripts" folder.
III. To make your launch pad tidy, right-click on its icon and choose in the context menu the following options:
-
Display as: Folder
-
View Content as: List
-
Sort by: Kind.
Now you can execute any script by selecting it in the list (fig. 2).
![]() A video on this topic is available here.
A video on this topic is available here.